FIBERARY 2018 GROWING WELD FOR DYEING BY MICHELLE PARRISH


FIBERARY 2018

Growing Weld for Dyeing by Michelle Parrish


If you are a gardener who is interested in dyeing with plants, there are many interesting dye plants that you can grow in your garden. Weld (Reseda luteola) is one of them. It is originally a Eurasian plant, and its use dates back to antiquity. It has not naturalized here in New England, unlike so many other Eurasian plants. So, if you want to use it, you have to grow it yourself or buy it from a natural dye supply company. It is relatively expensive to buy, but it’s very easy to grow, so I encourage you to grow your own. Weld produces a very lightfast source of yellow, thanks to the luteolin that is present in all the above-ground parts of the plant.


To grow weld, I find that it is difficult to direct-sow. The seeds are incredibly small, and need to be kept consistently mois while germinating. I usually start the seeds in small pots and transplant them when they’re big enough.

The plant has a taproot, so transplant carefully. Weld prefers alkaline soil, and you can add chalk or lime to your bed if your soil is acidic. I am fairly certain that only the black seeds are viable, but it is hard to to separate the green and tan seeds efficiently, so I just plant a pinch of mixed seed and thin the seedlings if necessary. Wherever you put it in your garden, be sure to leave space for much larger plants in the second year.

Weld is a biennial, which means that its lifecycle takes two years. In the first year, the plant grows low to the ground in a round clump or rosette.

Second year spring

The leaves are long and thin with wavy edges. You can use the leaves in the first year by cutting them close to the center of the plant. The quantity of plant material that you can gather in the first year is relatively small, though, so I usually wait until the second year to harvest weld. In its second year, weld sends up a tall woody stalk that can get as high as 5 feet. It produces tons of tiny creamy-colored flowers that are attractive to bees and other insects. It is easy to save your own seed, though cleaning it can be a chore. Some dyers find that letting the plants go to seed produces an unwanted abundance of volunteer weld seedlings. In my experience, I get at most one or two volunteers a year, which is manageable.


To harvest weld, cut down the entire stalk in full bloom.

If you are saving seed, wait until you can see dark colored seeds at the lowest part of the flowering stalk before harvesting. The flower stalks keep adding new flowers at the tip, while the seeds mature at the base. You can use weld fresh, or dry it for future use. I hang it upside down from a laundry-drying rack to dry. In some years, I have noticed a strong smell as the weld dries. It is not to everyone’s liking, so be prepared to dry it with ventilation or move your drying set-up if the smell becomes objectionable.


Once it’s dry, chop up the plant material to reduce the bulk, and store it in a dry location until you are ready to use it. I usually put dried weld in a paper bag to absorb any condensation when there are temperature fluctuations, and seal that inside a plastic bag. It also keeps well in a cardboard box.


To read about my seed saving and germination experiments, please visit my blog Local Color Dyes.

Michelle is an accomplished Spinner, Natural Dyer and a grower of Flax.  Stay tuned for the second part of this wonderful dye series on Weld   Continue reading

FIBERARY 2018-SPINNING DOG FUR – SANDY CARDINAL

SPINNING DOG FUR  SANDY CARDINAL

Spin Dog Fur?

My curiosity about spinning dog fur, also called Chiengora and considered an exotic fiber, began shortly after I traded a treadle sewing machine for an old spinning wheel.  New to spinning, I tried twisting anything that vaguely resembled fiber and talked too much about what might be spun.

A family friend heard me wonder about dog fur and sometime later I received a box of English Sheep Dog fur.  Actually, it was a box filled with vacuum packed bags of dog fur.  Eventually I worked up enough courage to open a bag and let it explode into the room – and my learning curve began.

The first experiment was to card the fur with wool in order to give it some memory, knit some hats, and  wove scarves for the dog’s owners.

With plenty left over, more scarves, more hats, and there is still yarn left in the ‘someday for something’ pile.

Some Lessons learned with this first round included:

  • Wash the fur before spinning. The finished yarn left mud in the bottom of the pan, and needed multiple washes and rinses
  • Pure English Sheep Dog fur spins nicely with or without blending with wool.
  • It’s ok to throw away the matted clumps! It’s a waste of time to try to save every fiber.
  • This yarn had a ‘halo’ and worked best with loose or open patterns similar to angora
  • People are really impressed when they learn the yarn is dog, then promptly put it to their nose and ask if it smells like dog when it’s wet.

My second experiment was with the fur from a friend’s mixed breed spaniel/poodle,  named Winnie.

She barely sheds and her coat is more hair than fur with no noticeable undercoat.  This batch of dog fur was from her ‘haircuts’ by the groomer.


It was too slippery, wouldn’t hold together, so I blended it with wool to give it some grab.   Even after blending it with wool the yarn wanted to shed.

I returned Winnie’s yarn to her owner and don’t know if it was ever used.

Lessons Learned:

  • Different breeds, different results.
  • Technique for washing fur is easy – Soak in a big bowl with hot water & Dawn dish detergent (or shampoo), Rinse and spin dry in a Salad Spinner, spread the gobs out onto a towel, then transfer to screening (inside away from any breeze!).  And, Yes, it’s ok to use the kitchen sink because the salad spinner keeps the fur from getting to your drain.

Next adventure is with my own dog’s fur.  Big old Bernese Mountain Dog who hates to be brushed or combed.  But, what little she lets me do has become 15 tall wastebasket size bags full of washed fur ready to card and spin.


Lessons Learned:

  • Don’t procrastinate! Dog owners and groomers can be wonderful sources of fiber.


Many thanks Sandy for these wonderful lessons on spinning dog fur.


FIBERUARY- NAAILBINDING BY KATHERINE JOHNSON

FIBERUARY       NAAILBINDING  BY KATHERINE JOHNSON

In September 2009, I opened my new issue of Piecework Magazine to read a re-print of a 1994 article by Linda Ligon called “The Ubiquitous Loop.” That was my introduction to simple looping, which became a gateway into the broader world of single needle work.

Simple looping is generally agreed to be the simplest form of single-needle fabric creation. The structure of it looks like this:


And here’s a piece I made in simple looping using jute garden twine (it’s upside down as compared to the drawing of the structure above):

It’s made with one needle (or no needle at all if your fiber is stiff and pointy enough to be worked by itself), and the movements are akin to hand sewing. In fact, the movements are exactly the same as for the buttonhole stitch in sewing or embroidery, only done in the air instead of in a piece of solid fabric.

And with this one “airy gesture,” as Ligon calls it, we span the millennia of human technology:

  • A fragment from Northern Germany about 7000 BCE, and net fragments from the Late Stone Age, Bronze Age, and Iron Age in Scandinavia and other northern European sites,
  • Fragments and a pouch or hat in a fancy openwork pattern from the desert southwest of the Dead Sea in about 6500 BCE,
  • A shirt from the first millennium BCE in Peru,
  • Sandals and bags from the first millennium CE in the American Southwest.
  • From historical accounts, baskets made by First Nations Athabascan-speaking people in northwestern Canada, and
  • Today in Papua New Guinea, Bolivia, Ecuador, and among the Hopi people, loop upon loop builds practical bucket-shaped bags, large decorative carrying bags, and gourd covers for ceremonial use.

Simple looping has been used for sturdy objects, like baskets, bags, and shoes. It has been used to create decorative edgings on larger textiles. It can be made simple and dense, or with skipped stitches and contours for an open, decorative fabric. Like crochet, it is endlessly organic and flexible. It’s very easy to create a fabric around an object, shaping as you go, to make a “sleeve” that was made to fit.

After reading the short article by Linda Ligon and then completing the tiny pouch from the related project, I was hooked. (If you’re interested in that pattern by Robin Taylor Dougherty, which includes a basic how-to on simple looping, you can find it on the Interweave Press website at http://www.interweave.com/article/needlework/a-treasure-pouch-in-simple-looping/). I made a couple of other pouches at different gauges, following the same basic idea. Then I found Donna Kallner (you can find her too online at http://www.donnakallnerfiberart.com/looping/about-looping/), bought her book, and worked through many of the projects in it. I fell deep into the rabbit hole of single needle work, adding traditional northern European needle binding (aka naalbinding, just to offer one possible spelling) to my list of fiber habits. Other single needle techniques include netting, needle lace, and (if you want to follow me right off the edge), shuttle tatting.

Give it a try. Maybe you’ll fall in love with this ancient, organic fabric-making approach. Just one needle and a couple arms’ lengths of yarn will connect you with some of humankind’s earliest technology


Katherine will be at Sheep and Shawl on Sunday March 5th.lecturing on Naailbinding and will be giving a one day work shop later in March.  Check out the Sheep and Shawl website for more details.


FIBERUARY-WEAVING BY EMILY WALSH GWYNN

FIBERuary is a celebration of all things fiber. I myself participate in a wide variety of fiber-related activities as a production weaver and a knitting teacher. I’m also a lazy spinner, an occasional felter and have dabbled in dyeing. Across all these fiberful activities the thing I love most is the community of other fabulous fiber fiends that make working with fiber so much fun. I could write about any of these communities, the spinning group that I have am lucky to be a part of, or of the wonderful dye party I attended last summer or about the joy of watching my knitting students learning not just from me, but from one another. But instead I am going to write about my weaving community, and in particular, about a wonderful, magical week-long collaboration I did with another young weaver, Kira Frech.
People often think of weaving as a solitary activity, and of course, it can be. But it needn’t be, and historically weaving would have been a community affair. I learned (in my time as an apprentice at the Vävstuga Weaving School) that in Sweden each village would have had a loom or looms in a sort of community center. Weavers would spend the winter cutting up rags which they would then weave on the community looms in spring (or whenever it was their turn). Weavers helped one another dress the loom and so many hands made light(er) work. Because of this Scandinavian tradition of cooperative weaving, students at Vävstuga learn to dress looms in teams.

Kira and I became friends when I was an apprentice and she came to Vävstiga for Basics, the pre-requisite for most other weaving courses there. Later, she returned for the Väv Immersion program, a 15-week course inspired by the weaving course Becky Ashenden had taken nearly 35 years ago at the Sätergläntan School in Sweden. We stay in touch thanks to the internet and earlier this year decided to create our own weaving mini-retreat and collaboration at my studio in Shelburne Falls. In 5 days we wound, beamed, threaded, sleyed and wove a 10-shaft satin damask block design and an 8 shaft pinwheel draft.

Damask:

Pinwheels

We each chose a project that was somewhat outside of our weaving norm and which allowed us to take advantage of each others expertise. I designed the pinwheel project in wool (for pillows!) with the knowledge that any troubles I had could be helped by Kira’s greater expertise in weaving wool. She designed the 10-shaft satin damask project in cotton and linen knowing that I spend a lot of time weaving similar block structures. We were thus able to support one another and felt encouraged to try new things.

Because we are trained, literally, in the same school of weaving, Kira and I were able to almost seamlessly move through the steps of setting up the looms together. It was truly magical. We worked together to solve problems along the way and accomplished more as a team than we could have flying solo. Here are some photos of us setting up the damask piece together.

Threading together:

Threading together and laughing:

Taking a break from sleying:

Once the weaving began our looms were booming and shuttles were flying and the studio just felt more alive. A few days later we were cutting off and packing things up so Kira could escape before a snowstorm hit. When she was gone the studio felt empty and I found myself wishing I could have a weaving buddy with me every day!

The bottom line is that weaving in community is so much better than weaving on your own. In fact, even Kira and I together could not have done this by ourselves! And that’s because we borrowed a pair of damask pulleys for this project from another local weaver, Elaine Palmer! It was only by all our powers combined that so much amazing weaving happened that week. I feel so grateful for my wonderful weaving community.

Happy FIBERurary.

-Emily

Emily F. Gwynn is a handweaver based in Shelburne Falls, MA. She specializes in weaving heirloom-quality textiles for the home. Visit her website atwww.handstoworktextiles.com

Kira Frech is a handweaver and natural dyer based in Harrisburg, PA. Visit her website at www.kirafrech.com

The Vävstuga Weaving School is located in Shelburne Falls, MA. While the apprenticeship program no longer exists, the 15-week Väv Immersion program is going strong and applications are being accepted now. For more information visit www.vavstuga.com

FIBERUARY- FIRST YEAR IN SHEEP BY MARTI FERGUSON

First Year In Sheep (almost), and Then Some

It’s February, 2017, and there are seven young Finnsheep up in my barn.

They are currently about 10 months old: five ewes and two rams. Most of them have been here since they were 10 weeks old.  Seeing as they are my first ever sheep, it’s been a busy, educational, eight months for me – but to be fair, the education began a long, long time before the sheep arrived.

Reading through FIBERuary, I see that most postings are expositions on pretty specific topics concerning any-of-many aspects of fiber, written by people with loads of experience and practice and time in their fields.  I’m essentially a raw beginner, and I’m still surfing the waves of anxiety and doubt that come right along with the excitement of a new venture. I can tell you what setting up a fiber farm has been for me, so far, but I can’t tell you how it will go from here, or where I’ll succeed and where I’ll need to, um, try harder.  For folks wondering what goes into starting a fiber venture with animals, I expect that there are as many paths as there are people.  Here’s a little view of mine…

Almost three years ago, when we moved to Western Mass from the mid-west, I knew I’d be looking to set up with animals. Though I wasn’t raised in the country, in Minnesota we’d had chickens and horses and land, so I had experience with pastures, tractors, manure piles, frozen water buckets, and the like – enough experience, hopefully, to know what I needed and what I was getting into. We found a property that would be suitable for a small flock and also meet the requirements of the other (human) members of my family.  It was time to buckle down and learn what I needed to do.

I tried to learn in whatever ways I could. There were books in the library, books on my bookshelves, magazines and websites. I attended online webinar series (yay! Maryland Sheep&Goat!), fencing seminars, Sheep and Wool Festivals and the workshops they hosted, Jill and Jim H-L’s Sheep-in-a-Day class (yay! pragmatic and hands-on!), Sheep Growers’ Association days. I talked to everyone I encountered who had or had had sheep.  I got a spinning wheel and learned how to use it.

I tried to learn something about EVERYTHING, or at least it feels that way.  Sheep breeds. Sheep diseases. The structure of wool, the structure of yarn. Fencing types, pros, cons. Livestock guard animals. Fleece processors. Mills. Carcasses. Wholesale cuts, retail cuts. Parasites. Forbes. Electricity. Drum carders. Combing. Picking. Flicking. Sheep reproduction. Scours. Scouring. Netting. Deep bedding. Skirting. Hoof trimming. Hay. Rhododendron, Yew, Mountain Laurel. Antibiotics. SubQ, IM. Drenching. CDT. Selenium. Copper. Hi-tensile knots. Coating. Creep. H. contortus. On and on. And all the while, I knew that I couldn’t really learn husbandry from a book – that at some point, soon, I was going to have to jump in with both feet and make my mistakes and take my knocks.


Getting my infrastructure in place took up the second summer in Massachusetts.  My property had lovely hillside pasture, but no fencing or barn.  I know that a lot of people run their sheep with portable electric netting alone, but I chose to build a permanent fence –  wood posts, woven wire, electrified wires at the top and bottom – and it helps me sleep when the coyotes are singing their crazy songs. My son and I built the entire fence by ourselves, and that is a whole ‘nother story entirely – I can just say that it was a rich learning experience.

Structure-wise, all the sheep would need was a simple shed.  But, for me, I built a barn (had it built, truly), one with four walls and doors that close. So now there is a place for the sheep, and room as well to store equipment and hay. And all of us, the ewes and me, will be comfortably out of the wind and wet when lambing time comes.   Currently, the barn seems really big, but with luck my estimates were sound, and when my flock reaches its full number, the square footage will be just right – Goldilocks style.

So a year and a half in, I had a barn and a fence and a head full of info, but when it came time to choose a specific breed of sheep, I was adrift.  I’d collected an embarrassing number of fleeces and partial fleeces, trying to decide what I liked for handspinning, but nothing was clicking. Or if I liked the fiber, I was finding that the breed was too wild, or too big, or not suited to a Massachusetts climate, or something else that made them not right for my farm.  I’d ruled out Finns early on because I didn’t like the sound of “litters of lambs”. One of Finnsheep’s most notable characteristics is their propensity to birth multiple lambs: not just twins, but triplets, quads, and beyond. Despite my reservations, I ended up talking to a Finn breeder at her booth at Rhinebeck in the fall of ’15. She assured me that Finnsheep’s awesome mothering instincts more than made up for the multiples – Finn mothers love their lambs and will not only NOT reject them (which sometimes happens with other breeds), they are even known to steal other ewes’ offspring.  This breeder assured me that she didn’t put up with bottle feeding lots of orphans, or “bummer” lambs, and that the sheep did the work. The conversation peaked my curiosity, and soon I was collecting more fleece samples, this time from different Finn farms.

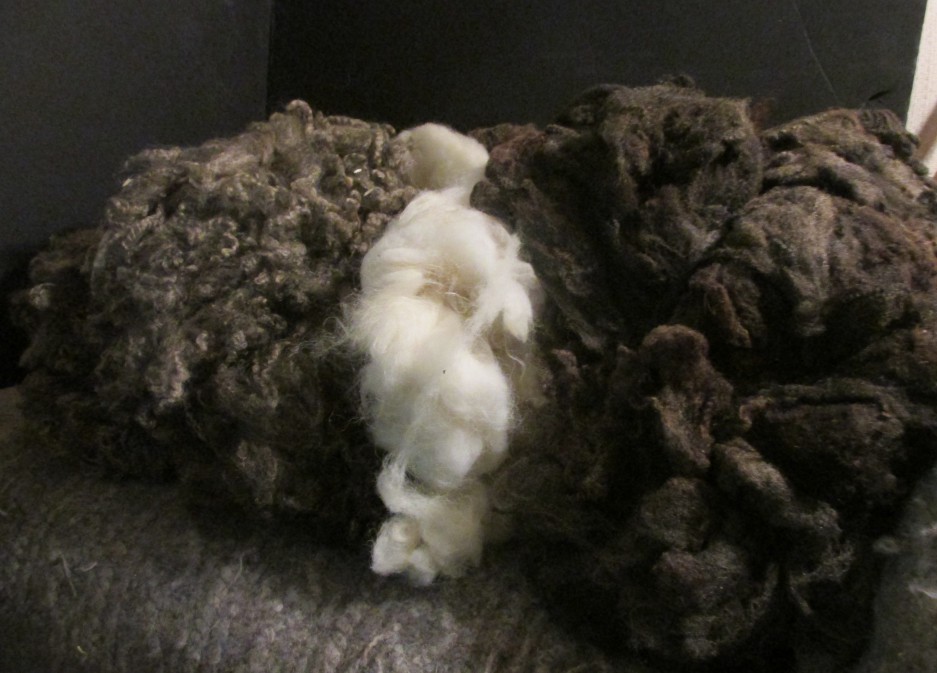
And I loved what I found. Finn fleeces vary, from animal to animal and farm to farm, but they are generally soft and silky, retaining both a good degree of bounce and often remarkable luster.  They come in colors – there is a broad palate of blacks, browns, grays and fawns, and patterns – solid, badger (light top, dark under), HST (head, socks, tail) & Piebald. For me, they were fun to spin and easy to prep – not a lot of grease and easy to wash, with fairly uniform staple length and consistency within each fleece.  Some samples felted very easily, others not so much, so there is variability in that, too. And beyond the fleece characteristics, I really liked what I found about Finns as a breed:  they are medium sized animals, naturally short-tailed so no need for docking, hardy in our climate, used as dual-purpose animals (fiber and meat), and known for their very sweet dispositions.  And all those darling babies.  It looked like a good match for a new shepherd who would be working solo and wasn’t getting any younger. I picked my favorite sample and placed an order with that breeder, and waited for my lambs.

From the time I picked them up in mid-June, it’s been smooth enough sailing, I think. I can’t say I was prepared for absolutely everything or knew what to do at every turn, but the sheep have been sweet and easy, and so far everybody seems well. We’ve gotten through vaccinations (oh no, needles!), de-worming (not so bad), learning about electric netting (only takes once), separating the boys from the girls (don’t wait too long!), putting them back together (no fireworks to speak of- seems sheep are discreet), and learning to love hay and put up with the dull days of winter. By late summer, I got a llama to serve as sentinel for the flock.  Chris took to his new job with surprising conviction, and the lambs took to Chris with surprising affection. As our strange February weather begins to hint at spring and the maple trees get going, the flock’s fleeces are big and thick and I’m looking forward to shearing day, even though it’s clear that I’ll need to get better at keeping the hay out of their wool (dribbly llama, indeed).  I’m wondering if the girls will be showing their bellies when the wool comes off.  They are young, but Finns are said to be capable mothers even as yearlings, so we’ll see. They certainly tell me they’re hungry enough to be growing lambs, every time I show up in the barn to feed them!

So I was prepared, to the extent I could be, and I am pleased, beyond expectation.  All along as well, I’ve been making mistakes: doing things wrong and doing ‘em over.  Small stuff, mostly, I think – I’m likely not yet aware of half the mistakes I’ve made so far. Hopefully none of them is critical.  And while I hope my sheep are pregnant, I’ll certainly be terrified if, and when, the lambs arrive in a couple of months. In other words, not every day is easy, and not everything is fun. I’ll be glad when I have several seasons of shepherding under my belt, and when every situation is not brand new, another test to pass. But I’m grateful to be learning so much, and to have great people and resources at hand to teach me.  I’m grateful as well that this education so far has only scratched the surface: it’s headsmacking to appreciate how much there is that can be known, and learned, and done. If I keep the right attitude I will stay satisfyingly busy until I’m dead.  It’s good to have goals.

One thing I wasn’t expecting was how taken I’d be by these animals’ temperaments.  I thought sheep would be fairly neutral: interested in grass, grain, and each other, tolerant (I hoped) of their keeper. These sheep are curious, friendly, and sweet as well: I get tail wags and zipper nibbles, they get their faces petted. I always have help with whatever I’m shoveling, or moving, or mending. I don’t know if this is sheep in general, Finnsheep in particular, or just my sheep especially. And for this, I’m not really concerned to find an answer. I’m happy to be these sheep’s shepherd, and I’ll look forward to their mentoring.  Here’s thanks to the sheep in the year that’s passed, and thanks to sheep in the years to come!

Marti Ferguson

Buckland, MA, February 2017

THE MASSACHUSETTS SHEEP AND WOOLCRAFT FAIR-FIBERUARY

FIBERUARY      MASSACHUSETTS SHEEP AND WOOLCRAFT FAIR  MAY 27 & 28, 2017


Massachusetts Sheep & Woolcraft Fair :: May 27 & 28, 2017


Shepherds are getting their sheep and fleeces ready, vendors are getting wool, yarns and crafts ready for you  to see and workshops are now in place.  Come and join us at the fair.  Located in the beautiful town of Cummington, Massachusetts, at the fairgrounds.   Good food will be available bring the family for a day of fun.  Sheep shows, Dog trails and lots of demos will await you.

WORKSHOPS

We are pleased to present our workshop schedule for 2017. We host great teachers from near and far. Bruce Engebretson writes for Spin Off Magazine, and teaches at Marshfield School of Weaving. He was trained in the Scandinavian tradition of fiber work. Katherine Johnson will teach us about Naalbinding, spelled variously: in English it is needle binding. Emily Gwynn enlightens us on using charts for knitting! Dotty Taft will be bringing her fleet of drum carder for us to experiment on.
On Saturday the cotton expert Joan Ruane of Bisbee AZ will be demonstrating how to spin cotton. On Sunday, Bruce Engebretson will demonstrate. Other guests will be joining us for various demonstrations.. Check out the Website for times and days.  masheepwool.org


Potluck Supper

A potluck supper will be held on the fairgrounds dining room at 6:00 p.m. on Saturday. Everyone is welcome. Please bring a prepared dish or salad sufficient to feed your family to the kitchen by 4:00 p.m. NO BREAD PLEASE! Rolls, beverages, and place settings will be provided.  Both refrigerators and a warming are available on the grounds.

Fleece Judging

The Dog Trials are always an exciting event

See you there


FIBERUARY HANDWOVEN KITCHEN TOWELS BY LISA BERTOLDI


                                 HANDWOVEN KITCHEN TOWELS  by LISA BERTOLDI

Kitchen towels!


I love big, thirsty, durable, substantial kitchen towels.  They speak to me of comfort, of meals prepared with caring and thoughtfulness.  Of hot corn bread carried to potluck suppers.  Picnics in fields.


When I was a child doing kitchen chores, I always had certain towels for which I reached.  Often they were decades-old linen towels.  One I have in my mind’s eye was a threadbare rag, so beloved for its softness and its generous size.


For the past nine years I have been weaving those towels.  Always in twill, for the maximum number of threads packed in per square inch, and always in cottolin and linen.  Cottolin, a Scandinavia invention from around the time of World War II, is a terrific thread:  it combines the strength of linen with the forgiveness, the stretch of cotton.  As a warp, it is nearly perfect.  And a weft, or crossing thread, of linen singles, gives gloss, gives absorbability.  I utilize threads from Sweden because they are of very high quality.

I weave these towels on a 160 centimeter Swedish loom, called Glimakra.  It’s a workhorse.  It behaves dependably and admirably, and I love it.  We are used to each other.  I know how the beater should sound, how the treadles should feel with each and every pass of the weft thread.


Each individual warp has a sweet spot, an inch or two in which the weft threads flow like water, and flow dependably, and each beat with the overhanging beater is perfect and satisfying.  That sweet spot is one of the great joys of weaving, for me.


The weaving, or weaving off, of the fabric is about one-third of the effort of the creation of new cloth.  One must design, then plan the warp;  wind the warp threads;  make the warp chain from those threads;  dress the loom;  then make the all-important sample.  Finally one weaves off the fabric.  Still not done!!  Hemming, then finishing of the fabric.  The final step is inspection of each towel.


I sell these towels to an enthusiastic public.  Women and men collect them year after year, in various color ways.  They are given as gifts for weddings, birthdays, house warmings.  I weave them large, nineteen or twenty inches wide, by about twenty-nine inches long, so they can be truly useful in the kitchen or at the picnic. They look great.  They become very buttery soft and yet more absorbent with time and use.


I have chosen to focus my weaving on one item, to make that item the best it can be.  Utility is foremost in my mind:  I want to supply superbly absorbent kitchen toweling.  Durability is critical:  I use strong, well made threads from a respected company.


I have a limited line, in a sign, which utilizes as a weft thread handspun linen.  I spin this linen thread myself, out of the highest quality flax stricks.  The thread is glossy, strong, lovely.  It is a slow and very satisfying process, and the resulting towels are special:  they look a bit rustic, they are a bit heavier, and the drape is exquisite.  They age marvelously.


Each year I perform experiments with rags made from my towels, to see how much use they can withstand.  They hold up really well, and can take many dozens of washings, they can take abrasion, they can take it all.

Weft Handwovens


www.weft.us


Lisa Bertoldi

51 Conway Road

Williamsburg MA 01096

Landline 413.268.7485

Bertoldi@crocker.com

Lisa also sent us some pictures of a recent Dye Party in Worthington last summer

Thanks Lisa for showing some naturally dyed yarns.  What a fun dye party that must have been,


THE LINEN SYMPOSIUM

GREETINGS My Fiber Friends

THE LINEN SYMPOSIUM AN OVERVIEW

For those of you who did not attend it was a fully packed 2 days of speakers, information, and just plain fun.Speakers and participants were from all over the country and Canada.  We were growers, want to be growers, weavers, spinners and dyers and much more.   We learned so much, made contacts with like minded people.  It was  a perfect event.  A big thank you to the members of The New England Flax and Study group and Old Deerfield Village who supplied such a wonderful place to hold this event.  I am sure there will be much more about this event coming in Feburary but for now here are some pictures of the event.

Hope you enjoyed this pictures.  I am hoping that this event will continue in the future.

Carole

Would you like to write an article on your adventures in fiber?  Please e-mail me wspines@aol.com


FIBERuary SHEEP AND SHAWL

HELLO


FIBERuary Day 28  GROWING AND PROCESSING FLAX   Talk and demo at Sheep and Shawl.                               with Michelle Phillips

Today was the last in a series of 4 talks given at Sheep and Shawl. Thanks to Liz and John for hosting these wonderful talks.

Michelle did a wonderful job of explaining the planting and finishing process of Flax.  I wanted to share with you pictures of this event. Everyone who wanted to got a chance to try their hand at it and see many wonder samples from the plant itself to the finished product.

IMG_6476

Three different varieties of Flax

IMG_6478

Dryed and Retted, ready for processing

IMG_6481

Michelle using a Flax Brake.  This brakes the fiber from the stem.

IMG_6484

This is a plant with a break in it, you can see the fiber between the break

IMG_6486

Michelle using the Heckle.  The heckle splits and straightens flax fibers for spinning.

A wonderful time was had by all. 


FIBERuary Jill and Jim Lyons

Hello

FIBERuary Day 27   SKIRTING FLEECES


Skirting Fleece


“Skirting” is the traditional term for removing less desirable/ clearly unusable parts of a sheep fleece.  When a fleece is laid out- cut side down- it looks something like this:

(in this sketch, the head end of the fleece is facing down).  You’ll see that the outside edges of the fleece, all the way around, are the edges to be removed.  (Think of a laid out skirt, with the hem chopped off.)


It’s helpful to lay the fleece out on a skirting table.  Ours is about 4’ by 8’, a wooden frame around welded wire that’s set on sawhorses.  The holes in the wire let some small bits fall through.


The amount of skirting to be done on any particular fleece can vary tremendously:  all the way from none to virtually the entire fleece.


For me, the two things I’m skirting is fiber that is structurally unsound or contaminated by vegetation.  Structurally unsound fleece can be:

  • Fleece from the belly or legs (often a very different quality).
  • Fleece with kemp (hair not wool) fibers- unless from a fleece that should have kemp.
  • Fleece so weathered that all oil is gone.  This fleece is usually found around the edges and (particularly in luster fleece) along the backbone.
  • Parts of fleece that are cotted (clumped together)
  • Fleece with a break (usually caused by stress, when the wool growth has been retarded)
  • Fleece contaminated with manure and so weathered or colored.
  • “Second cuts” or short bits where the shearer has sheared some fleece twice.


Most vegetal contamination is caused by hay or by weeds.  Sheep are gregarious creatures, and love to chew while turning their head over the back of the sheep next to them.  (My tallest sheep almost always have less back hay than the shorter ones.)  They love to pull out great bunches of hay, dropping the uneaten portions.  This is why most sheep feeders have small openings, forcing the sheep to take smaller bites.  Sheep will also dribble hay over their own and their neighbors’ neck wool. Weeds can be of many species.  We’re renovating old pasture and my two biggest problems come from burdock and thistles…sometimes I don’t get to removing them before the sheep find them.  Burdocks aren’t too bad to get out- as long as they’re removed right after they attach.  I once had some sheep get into beggars’ ticks- most of that fleece had to be tossed.


So from a shepherd’s perspective, how do you keep the fleeces clean?  There are lots of strategies:

  • Most time consuming, expensive and effective are sheep coats.  These need to be kept clean (washed and dried after a bout of hot, wet weather- and other times.  Lots of labor- but the value of your fleece is doubled- or tripled.
  • Pay attention to your pastures.  Always check them and remove weeds before turning the sheep into a new section.
  • In winter with snow, ground feed your sheep on clean snow each day.  When you do this, you break the bale into flakes and lay each flake out about 3 feet from any other.  This reduces hay from one dropping into the fleece of a neighboring sheep.
  • We’re trying a new experiment this year, shearing in the fall instead of the spring.  This means that we’re shearing fleece that’s been grazing and not eating hay for five or six months.  The hay falling onto shorter fleece seems to stick less- and some likely washes out over the summer.  The couple we experimented with worked well- we’ll have to see what the whole group look like in October.


The photos are of a Romney fleece with six months growth which was shorn in the fall.  The fleece is a bit jumbled- but  the first picture shows about one third of the fleece, with the two small piles on the right being the fleece I’ve skirted out.

The next photo is a close up of some of the wool so you can see the staple.

From a spinner’s perspective, a lot depends on how bad the fleece is and how much you like it.  One of the frustrations is that the finest fleece around the neck is generally in the worst shape, as shown on the two diagrams below. 

When I skirt I actually sort into three bags:  Prime, Seconds, and Skirtings.  I’ve learned that I can often use the seconds- after washing and dyeing they can surprise me.  I’m still looking for skirting uses.  It composts very slowly, makes lousy mulch.  I’ve had people use it for insulation in a double wall (unwashed….not sure what it attracts).  Someone tried to use it as the first layer on a green (ie, planted) roof.  Our dogs have bags of it to sleep on during cold winters….but I just replace the wool if it gets soaked with urine or throw-up.


I do weigh and make notes about each fleece, and I use those notes when breeding and when culling.


When you buy a fleece it should be clean!  You still should lay it out and look at it whole.  Are the different sections of fleece similar in staple length and softness?  If not and you want to make one project from that whole fleece, you’ll need to take care to evenly blend the different kinds of fiber.  Lots of times I just use the different types of fleece in different ways.


Hope this helps you approach a fleece- buying one raw (in the grease) is a great way to start.  Fun- and it smells good.


Jill Horton-Lyons

Winterberry Farm